Like a Wall Torn from the Street: Create a Bold Artwork with a Street Art Stencil

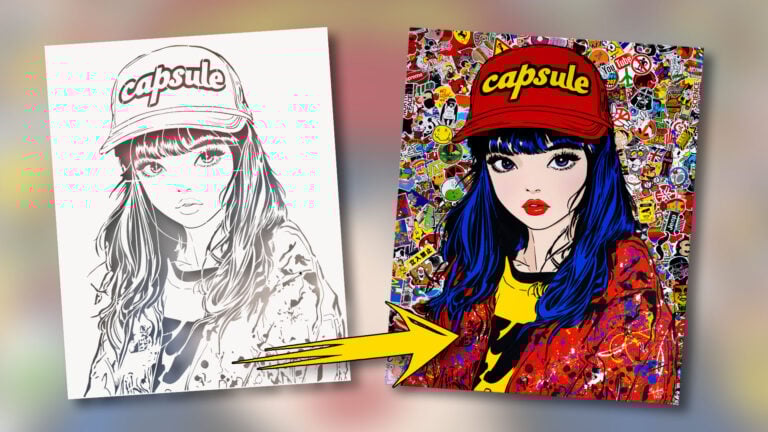
Street art is a powerful form of expression that combines boldness, creativity, and freedom of interpretation. In our exclusive demonstration, we invite you to discover how to create your own artwork using one of our street art stencils designed by John Beckley. In this article, we offer you a complete immersion in the creation of a unique piece titled “The Defiant One”, inspired by street art and created with stencil techniques. You will also find a demonstration video that shows every step of the process, from color selection to the finishing touches on the background.
A Work in Video: Watch “The Defiant One” Come to Life
We invite you to check out our demonstration video, which showcases the full creation of “The Defiant One”. In this video, you can observe the creative process in action: the application of street art stencils, the layering of paint, and how the details gradually take shape. This inspiring visual demonstration allows you to follow each step of the creation. It’s perfect for anyone interested in urban art and who wants to dive into the world of street art, where boldness and spontaneity are essential.
Contemporary Street Art: A Visual Rebellion
Street art, and particularly stencil art, stands out for its strong messages and striking visuals. “The Defiant One” fits perfectly into this tradition, blending a direct urban style with a powerful minimalistic aesthetic. The artwork is based on simple forms, sharp contrasts, and an attitude that grabs attention. This painting tells a story of resistance and self-affirmation, with a female figure embodying rebellion against established conventions.
The style of the painting reflects the influences of contemporary street art, especially from iconic artists like Banksy, Blek le Rat, and Miss.Tic, known for their subversive approaches and social critiques. “The Defiant One” captures the spirit of freedom and defiance, where attitude is just as important as visual aesthetics. The central character, calm and nonchalant, stands out against a dynamic background, saturated with colors and abstract graffiti. This contrast between urban chaos and the character’s inner calm is one of the key elements of the composition.
The Inspiration Behind “The Defiant One”
“The Defiant One” is much more than just a painting. It’s a true declaration of independence and freedom. The female character represents inner strength and the ability to remain unfazed by external pressures. The chaos of the modern world is illustrated by the vibrant, textured background. Yet, this female figure remains steady, refusing to conform. She symbolizes the rejection of conformity and self-assertion.
The background, created using additional graffiti stencils, brings visual dynamism while leaving room for interpretation. Each element of the background tells a different story, but they all converge to emphasize the strength and attitude of the protagonist. This visual contrast between chaos and control, typical of contemporary street art, reinforces the power of the artwork.
Materials Used for the Creation
To create this 80×100 cm artwork, John used a combination of acrylic paint and spray paint—both go-to tools in street art. The main stencil, also 80×100 cm, was designed exclusively for our store by John Beckley. This street art stencil is used to create the clean, bold lines of the central character, while the graffiti in the background was added using a second stencil, adding extra depth to the composition.
Creation Steps
1. Preparing the Textured Background
John started by applying a mixture of sand and fine texture paste across the entire canvas. This helps create a background that resembles a concrete wall or rough plaster, perfect for simulating the raw and urban feel of street art. To achieve this effect, you can use fine texture paste mixed with sand, or choose a thick texture paste that already contains sand grains. It is recommended not to use gesso, as it’s too liquid to create the desired texture.

2. Applying the Light Gray Base Coat
Once the texture was dry, John covered the canvas with a layer of light gray paint. This color enhances the “concrete wall” effect, creating a realistic impression of urban material. It’s essential to let this coat dry before moving on to the next step.

3. First Stencil: Layering Graffiti
Next, John positioned a specially designed stencil to represent overlapping graffiti, similar to what you might see on urban street walls. He applied a layer of black paint over the stencil, simply to make the graffiti appear on the background of the artwork.


Graffiti Wall Stencil – GR0015
To enhance your creations and add depth to your backgrounds, explore our collection of graffiti stencils. These designs are specifically crafted to capture the energy and visual chaos typical of urban walls. Perfect for creating dynamic backgrounds, these stencils allow you to layer different textures and patterns, adding a unique dimension to your artwork.


4. Adding Colors to the Graffiti
After applying the first coat of black paint, John added touches of color to certain parts of the graffiti. These bright colors energize the background and reflect the chaotic energy typical of street art.

5. Paint Splatters and Drips
To emphasize the raw look of the background, John splattered white paint across the canvas and created drips using a pipette. This splattering effect adds an expressive and spontaneous feel to the background, which is typical of street art, where raw energy and visual imperfections are integral to the composition.

6. Reapplying the Graffiti Stencil
After completing the drip effects, John repositioned the original stencil representing the graffiti. He applied another coat of black paint to make the graffiti appear more definitively, setting it as a key element in the artwork’s background.

Graffiti Wall Stencil – GR0015
7. Shadows and Realism with Spray Paint
To make the background even more realistic, John used a black spray can to soften the edges of certain graffiti elements and create shadows. This made the edges less defined and added more depth, giving the canvas a dynamic and authentic street wall feel, typical of street art stencils.

8. Adding a Weathered Effect
To finalize the “worn wall” effect, John used a spray bottle filled with a mixture of water and a small amount of black paint. He sprayed this mixture onto certain parts of the vertically positioned canvas, creating dirt-like traces that enhance the artwork’s authenticity, making it look like a weathered urban wall.

9. Applying the Character Stencil
Once the background was complete, John placed a stencil representing the central character—a woman holding a gun. He applied a layer of black paint to mark the figure’s contours, adding a dramatic and powerful dimension to the artwork.


“Rebel Attitude” Woman Stencil – PA0028
10. Outlining and Filling the Character
After removing the stencil, John outlined the character to make her stand out. Then, he filled in the figure with the same light gray paint used for the background. This approach maintains visual continuity while creating a subtle contrast with the black contours.


11. Reapplying the Stencil and Enhancing Details
To enhance the character’s details, John repositioned the stencil and applied another coat of black paint. This step sharpens the lines and gives the character a stronger presence.

“Rebel Attitude” Woman Stencil – PA0028
12. Touching Up the Stencil Bridges
After removing the stencil one last time, John carefully painted over the bridges left by the stencil with black paint. This hides any small gaps and creates a cleaner, more professional finish.

13. Creating the Cigarette Smoke
One key detail in this artwork is the cigarette smoke. To achieve this, John used diluted light gray paint to create small wisps of smoke. He layered several thin coats to get this realistic, floating smoke effect. For the best results with acrylic paint, it’s recommended to use a fine brush and apply the paint in thin layers.

14. Final Weathering and Aged Effect
To conclude and give the piece a final realistic touch, John “dirtied” the character by applying paint with his hands, as if someone had touched the wall. He also used the spray bottle again to add diluted black paint splatters on the character and parts of the canvas. This gesture mimics a wall that has been weathered by time and human interaction, enhancing the urban authenticity of the piece, typical of street art stencils.


The Finished Piece: A Fusion of Rebellion and Mastery
After all these meticulous steps, “The Defiant One” finally comes to life in its complete form. The chaotic graffiti background contrasts beautifully with the imposing calm of the central figure. Every detail, from the texture of the “wall” to the character’s nonchalance, contributes to the visual and symbolic impact of the artwork. This fusion of technical mastery and rebellious attitude perfectly captures the essence of contemporary street art, offering a bold and resolutely urban composition. It’s a piece that catches the eye while leaving a lasting impression.

Why Use Street Art Stencils for Your Creations?
Street art stencils aren’t just a technique—they’re a style all their own. They offer a unique way to create sharp, precise patterns that can only be achieved using stencils. This method captures the very essence of street art with bold shapes and striking contrasts, delivering a powerful visual impact. The distinct style of stencils gives every artwork an urban, graphic character that other techniques simply cannot replicate.
Using street art stencils also allows for great creative freedom. Whether you’re a beginner or an experienced artist, this technique enables you to achieve impressive results while remaining accessible. It’s not just about replicating patterns—it’s about creating works of art that stand out for their precision and originality.
Our stencils are specially designed to be reusable and easy to handle, allowing you to experiment with different color combinations, surfaces, and textures. Whether you’re working on a canvas, a wall, or even furniture, using street art stencils will instantly add an artistic dimension to your projects, with a unique style that only stencils can offer.
Conclusion
“The Defiant One” is a piece that captures the essence of contemporary street art: it is both an homage to rebellion and a celebration of individual freedom. With our demonstration video, you have the opportunity to recreate this artwork at home, using our exclusive street art stencils. Whether you’re a street art enthusiast or a novice in the use of stencils, this article provides you with a deep dive into a limitless creative universe. So don’t wait—grab your stencils, your paint, and let your creativity flow!
FAQ
- How do I use a stencil to create street art?
Using a stencil in street art allows you to create precise, repeatable patterns. Simply place or secure the stencil on your chosen surface and apply paint using spray cans or brushes. - What materials do I need to work with a stencil?
You’ll need acrylic paint, spray paint, or a roller, and of course, stencils. - Are stencils reusable?
Yes, our stencils are designed to be reused many times. - What type of surfaces are suitable for stencils?
Stencils can be used on a variety of surfaces such as canvas, walls, wood, or even textiles. Make sure the surface is clean and smooth for the best results. - Can I use different paint colors with a stencil?
Absolutely! Stencils allow for great creativity with colors. You can layer multiple coats of paint for a more dynamic effect. - Where can I buy the stencils used in the video?
The stencils featured in the video are available in our online store. You can order them directly from our website. Visit the store.